Image Map

Sunday, March 31, 2013

March in Review

And just like that, March is over. I really can't believe Spring is here; it feels like just yesterday I was dancing the night away to a David Bowie cover band on New Years Eve. Here are a few of my favorite posts from this month! Oh, and I hope that if you celebrate Easter, you are having a great holiday!

Used up some leftover mashed potatoes and made some cheddar and chive mashed potato bites. Yuuum!

I wore a ton of polka dots and layers. Pretty soon I'll have to hang up the scarves and boots. 

Got festive and tried the ombre method for my Easter eggs. A martini glass makes the whole process super easy!

The blog got a makeover from the awesome Oana Befort! I love the airy feel to it. 

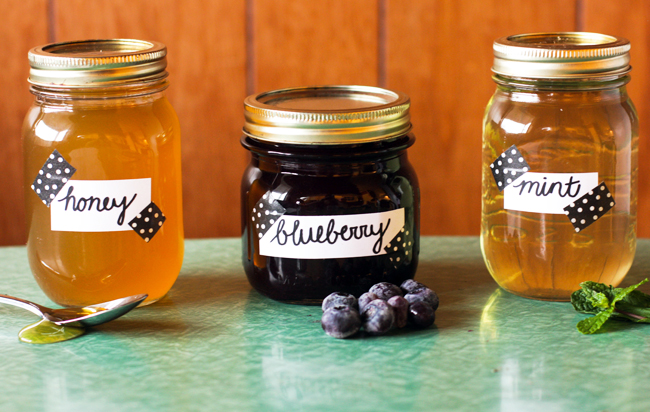
Made some simple syrups, which were super easy and led to lots of other tasty cocktails (Blueberry gin & tonic, Lemon honey highball and a Minty Mojito)

Enjoyed some coffe and cake with my mom and sister at my favorite bakery, Pure Bliss

Listening To: 
St.Vincent's album "Strange Mercy." In particular, the track "Cheerleader. "

Watching:
Catching up on season 2 of Girls. Such a funny, awkward, sad and embarrassing show. I both love and hate Hannah...which I guess that's the point, haha. 

Other:
Said goodbye to a coworker and hello to two new, visited tons of antique stores, joined a gym, ate too many girl scout cookies, tried saki for the first time, started seriously looking for a new place to live, season three of Game of Thrones! Yayy!


Saturday, March 30, 2013

ombre easter eggs

My favorite Easter memory happened when I was about five or six. My mom and I went to a local high school for an Easter egg "hunt."  There was no hunting whatsoever, all the eggs were   placed on the football field in plain sight; it was more of a easter egg dash. All the kids stood around the edge of the field and when the whistle blew, we all ran to grab as many plastic eggs as possible.

As I was filling my basket, a younger girl asked if she could have a few of my eggs so I gave some to her. One of the volunteers at the event saw me giving the girl some eggs and gave me a special gold egg in return. I was able to trade the gold egg in for a huge easter basket, complete for candy and dollar store toys. Score! Lesson learned.


While easter egg hunts are kinda off limits to twenty-somethings who don't have children or aren't visiting family, decorating eggs is still acceptable. I saw a few ombre eggs floating around Pinterest, so I decided to give it a try! I think I found a technique that works pretty well.

You need:
Hard boiled eggs (I used this method)
Food coloring
White vinegar
Boiling hot water
Martini glass
Deep bowl/dish/cup


1. After eggs have been cooked, choose what colors you'd like to use. Fill bowl/dish/cup with about 6-9 drops of food coloring, 1 tablespoon vinegar and 1 cup hot water. Your egg should be submerged in dye (If not fully submerged, remember to stir around container continuously. Leave in dye for about 1-2 minutes, or until egg has taken on a light amount of color. Take egg out of dye, rinse and let pat dry.

** I recommend completing the previous step (and all following) on all eggs before moving on to the next. You don't want to keep making new dyes!

2. In the martini glass, prepare a slightly stronger mixture. Mix about a tablespoon vinegar and approx. ten drops of food coloring in to martini glass. Place egg in mixture, and add hot water until dye reaches the desired level on the egg. Let sit in dye for 2-3 minutes, or until egg has reached desired color.


3. Rinse egg off in water and pat dry. Make another dye (approx. 1 tablespoon vinegar, ten drops of color and hot water to desired level) and let egg sit for another 2-3 minutes (longer if color is not deep enough). Rinse and pat dry. Voila! Beautiful ombre eggs.

Wednesday, March 27, 2013

warming up


Dress: Bar III (Macy's
Cardigan: Urban Outfitters
Earrings: Forver 21
Tights: Target
Boots: Corso Como
Bag: Old Navy
Jacket: Delia's

Uff da! It's been a long day and I'm wiped out. It's that time again at the Clinique counter (gift with purchase!) and while it's fun, it's also extremely exhausting. Today I worked with about 75 clients with no time to stop. It makes the day fly by, but it's really draining. I passed out on Tommy's bed with Atticus around 11, which for me is pretty early. This picture is kinda embarrassing, but also kinda great. New favorite for sure. 


While I was still in go mode yesterday, I talked Tommy into taking some outfit pictures ("Hey baaaabe...wanna go to the park really fast, then go get dinner? eh eh?') and it felt so good to get a ray of sunshine. Sometimes I'm a summer scrooge, but it's the little things like a warm car and iced coffee that remind me that spring/summer are pretty great. 

After snapping these pictures we enjoyed some sushi on a really awkwardly placed table, and I tried saki for the first time. Not bad! Not my first choice, but not bad. We splurged and tried  fried avocado as well, and it was just as good as you might think. 

Anybody else counting down the days till Game of Thrones this Friday? Ahhh! So excited, 

Monday, March 25, 2013

Chocolate and Coconut Pretzels


Sweet and salty food is dangerously good, it's just so addictive! Kettle corn is particularly lethal, I instead call it "crack corn" because it's so hard to stop eating. These little pretzels dipped in chocolate and toasted coconut definitely fall into the same "addictive" category. Easy to make and even easier to eat, they remind me a bit of samoas but with more salt and crunch. Yum!


I made a big batch because I'm taking some to work today, so scale down the recipe as needed. Makes about 10 dozen.

You need:
mini pretzels
14 oz semi-sweet chocolate chips
approx. 7 oz sweetened coconut

1. To toast coconut, preheat oven to 350 degrees and let bake for about 15-20 minutes, stirring periodically to make sure it toasts evenly. Once done, place in large bowl.
2. Melt chocolate chips using a double boiler or microwave. Be careful with your chocolate, you don't want it to seize! Here is some good info about melting chocolate.


3. Dip pretzel into melted chocolate, then into toasted coconut. Lay on a cookie sheet lined with parchment paper/foil and allow to cool completely. I popped mine in the freezer to speed up that process :).

Sunday, March 24, 2013

Atticus the catticus

I'm gonna get a little crazy cat-lady now, because my cat just might be the cutest cat in the world. I have evidence to support this theory. First of all, look at these adorable kitten pictures.


Oh my lordy, I melt. I didn't want him to grow up and get big, but against all odds, he got    cuter. How does that work?


I think I proved my point. I could post so many more pictures, but I will stop while I'm still a tiny bit ahead. :)

Friday, March 22, 2013

third dots a charm


Dress: Nordstrom
Zip up: Nordstrom
Jacket: Target
Earrings: Little Black Bag
Scarf: Target
Shoes: Consigned 

Even though this is my third outfit post in a row including polka dots, I swear I don't wear them everyday. That being said, if I could wear them everyday I probably would! They just make me happy. Do you have any prints that you just can't stay away from? 

I first saw this jacket online and really wanted to order it, but there are just some items that are tricky to buy without trying them on. For me, jackets fit into the "tricky" category. So while I was picking up a plethora of random items at Target, I was lucky enough to spot it! It's the perfect Pacific Northwest jacket because it's lightweight and rain resistant. The weather has been crazy lately (sun one minute, hail the next) so layers are important! 

Tommy and I have been looking to move for a while now. Even though I love our little old house, it has had a lot of problems. Other than craigslist, anybody know of a good website to find rentals? 


Wednesday, March 20, 2013

black & white favorites

It's exciting to notice little shifts in your style, aesthetic and taste. I've always loved very feminine and delicate pieces, but lately I've found myself attracted to more graphic, bold objects. Black and white in particular has been a favorite color combo!


1. Dress, Topshop // 2. Sunglasses, Target // 3. Necklace, Nordstrom // 4. Pillow, Society6 // 5. Sandals, Net-A-Porter

PS: Any Html wizards out there who could help me a bit? Shoot me an email (amandakbybay@hotmail.com), there are just a few things I would like to tweak, and it's driving me crazy! 

Tuesday, March 19, 2013

Cheddar and Chive Mashed Potato Bites


Yes, you read that title correctly. These are mashed potatoes combined with chives and cheddar cheese, then formed into little bite sized nuggets of amazing. You on board? Thought so.


About a week ago, I finally cooked a turkey that my mom gave to me for Thanksgiving. It turned out awesome, and we had lots of turkey for sandwiches, salads and turkey soup. Of course we had to have a mini Thanksgiving dinner, complete with mashed potatoes, gravy and brussel sprouts.

 I ended up making way too much mashed potatoes, so I started thinking about what to make with them when it hit me: fried mashed potato bites. I couldn't get the idea out of my head! They ended up being everything I hoped they would be; these little bites are crunchy on the outside, warm and cheesy on the inside. I chose to dip them in a mustard sauce, but ketchup would be yummy too!

Cheddar and Chive Mashed Potato Bites:
4 cups leftover mashed potatoes
1 1/2 cups grated sharp cheddar cheese
2 tbs chopped chives (I used dried but I'm sure fresh would be great too!)
1 tbs spicy brown mustard
5 eggs
3 cups plain bread crumbs
Frying oil of your choice (I used vegetable)

Mustard Dipping Sauce:
1 cup sour cream
1/2 cup spicy brown mustard
Sriracha sauce to taste

*Makes about 40 potato bites. Perfect for a party!

1. Mix together potatoes, cheese, chives and mustard. Season with salt and pepper if necessary.
2. Place eggs and breadcrumbs into two separate bowls. Whisk eggs.


3. Using a tablespoon of potato mixture, form balls. Place ball into egg mixture, coat in breadcrumbs, place back into egg mixture and coat with breadcrumbs again.
4. After all balls have been coated in egg and breadcrumbs, heat approximately 1/2 inch of oil in frying pan to about 350-375 degrees.
5. Before frying, cover a cookie sheet with something to absorb extra oil. I used a grocery bag, but paper towels would work too.
6. Place about 5-7 bites into oil, and let cook for about 30 seconds (or until golden) and turn until all sides are golden brown. Place potato bites onto cookie sheet.


7. Serve immediately! I stored my leftovers in the fridge and heated them back up in the oven. The microwave worked alright in a pinch.


Sunday, March 17, 2013

Minty Mojito


St. Patrick's Day is fun, but it's a little bit of a silly holiday if you ask me. I'm not really sure why we celebrate it; I figure it's because St. Patrick was a really cool guy back in the day, and super into shamrocks, leprechauns, drinking and all things green. I know it's more serious than that, and I've heard the real story a few times, but for some reason it never sticks. You can bet I'll be educating myself about this holiday for the 50th time via Google right after this post.

Even though I consider St. Patrick's Day to be a filler holiday, I still think it's a fun reason to spend your day surrounded with green, make corned beef and cabbage or other Irish dish, and drink a few more beers than usual. It's also fun to break out the green food coloring and add it to a few recipes! This simple cocktail uses mint syrup to make it extra minty, and if you'd like to get extra festive, I used a drop of green food coloring to celebrate St. Patty's Day properly. 


Minty Mojito: 
2 ounces light (clear) rum
club soda
mint leaves
fresh lime juice
ice
food coloring (optional)

1. Add about 10-15 fresh mint leaves to tall glass and mint syrup. Muddle mint leaves so essential oils combine with syrup.
2. Add ice,  rum and lime juice from half a lime. Fill the rest of glass with club soda. Top with fresh lime wedge and add one drop food coloring if desired. 


Saturday, March 16, 2013

business on top


Jacket: Forever21
Shirt: Forever21
Pants: Else 
Necklace: Forever21 
Boots: Corso Como

So, ladies with a larger bust, you understand my love/hate relationship with button down shirts. On one hand, they are super universal and cute. On the other hand, the second (or third) button needs constant attention and reaching the top shelf isn't that comfortable. I guess I don't really have a point other than it sucks. Don't worry, I'm in the process of calling the wahh-bulance :). Do any of you top-gifted ladies have any tips for me? Maybe brands that fit well on top? 

Clinique gift with purchase in on the way, so life is about to get really busy. Yuck. Luckily we got Game of Thrones starting on Easter Sunday (sorry family, I'm busy watching HBO), and other good things on the horizon. Let's go. 

Friday, March 15, 2013

new layout

I'm really excited to share with you guys my new layout by Oana Befort. She was a real pleasure to work with, and made the whole process really fun and simple. Here are a few images from the Pinterest mood board I made to gather inspiration.


Tuesday, March 12, 2013

love for layers


Shirt: Delia's
Jacket: Delia's
Skirt: thrifted
Scarf: Target
Shoes: Charlotte Russe
Earrings: Forever21

If all the cardigans in my closet suddenly vanished, I wouldn't know how to dress myself. In western Washington's constant mild but ever changing weather, they are the perfect layering piece. I may or may not have about eight of them. While I'm on the topic of layers, I should mention how awesome this jean jacket is. This winter was so mild that I rarely needed anything warmer than this jacket! 

I took these pictures around 6:30 pm yesterday and still had enough light! I love longer days for many reasons, but I think all style/fashion bloggers would agree that it makes taking pictures so much easier. 

Today I'm off to work, then heading to the movie theater to see the new Oz movie. Have you seen it yet? I'm not expecting anything amazing, but the visuals look impressive. Plus, James Franco. Nuff said. 

Monday, March 11, 2013

my hair color routine

A wrote a post about hair dye a long time ago, but since then I have changed my dying routine a bit, so I thought a new post was in order! 

Like I said in my older post, I used to be blonde up until my freshman year of college when I went brunette. It was a nice change, but brown just wasn't for me. I soon tried red, and I don't see it going anywhere anytime soon! 

On average, I dye my hair about every 5 weeks. Sometimes I wait longer, and sometimes I need to dye it before then. It all depends on how often you wash your hair, the type of shampoo you use, the temperature of your water and what type of hair dye. 

Make your red hair last longer:
  • Wait as long as you can to wash your hair. I usually wash mine about every three days. Dry shampoo (or baby powder) is your friend! 
  • When you do shower, use a sulfate free shampoo. I have used really expensive and cheaper shampoos, and the one I keep coming back to is Loreal's EverPure Volume Shampoo and conditioner. 
  • Wash your hair with water that is as cold as you can stand. If you can handle washing your hair with icy water, this would make the red last much longer. Personally I don't have that willpower, but do try to turn the temperature down when I wash it. When I wash my hair for the first time after dying it, I usually use cold water. 
  • Try different dyes, see which work for you the best. I used Loreal Preference for a long time, and liked it just fine. That is until I got my hands on some Redken Color Gels thanks to a friend of mine with a cosmo license. The Redken Color Gels are more vibrant and last longer for me, but if you don't have access to a professional beauty supply store, hop over to Sally's and try Loreal. 
So you wanna go red? I'd be happy to show you my hair color method! You need a color applicator bottle, gloves, developer (I use level 30) and your color. I have recently been mixing one part "Flame," with two parts "Bonfire." "Bonfire" is an orange base and a  level 6 (smaller the level number, the lighter your color will be) while "Flame" is a red base level 7. 


I like to use more "Bonfire," because it's an orange base rather than a red base, and I like it really warm and orange-y. Pay attention to the bases of your colors! They could be blue, violet, gold, red, orange, etc. These undertones play a huge part in what your color will turn out like. For example if I grabbed a blue base and used it with my red, I would get more of a violet-red, rather than an orange. If you wanna read more about all this, I recommend reading this and this.


Make sure your hair is well brushed, to make application easier. Once hair is brushed thoroughly, make sure you got your gloves on! Oh, and a raggedy shirt is good to have as well.


I like to first put my hair up in order to get the color at my roots in the back. Squeeze out color directly onto roots, and massage in with fingers. Once you have your back hairline covered in color,  let down another section of hair, securing the remainder on the top of your head. Massage color into roots, then squeeze color onto gloves and apply to the entire strand, making sure to get the ends. 


Repeat this process until all hair is covered in dye. Take a wet washcloth that you don't care about and clean up any dye that may have gotten on your skin (don't forget your ears and back hairline!). Wait about 30 minutes and wash with cool water. Yay, fresh and vibrant red hair!