Image Map
Showing posts with label DIY. Show all posts

Tuesday, October 8, 2013

Layered Leaf Art DIY


It's hard not to feel inspired by the leaves during fall. They look so beautiful as they change from green to yellow, orange and red! While driving around the other day and admiring them, I felt the urge to create some art. I started brainstorming how I could incorporate leaves, and this little project was born!

I'm really happy how this project turned out. It's really easy once you get the hang of glueing down the leaves, and pretty cheap if you already have most of these materials like I did. I love the texture, and any excuse to add a little gold into my home is okay by me :).


You need:
Leaves
Spray paint
Glue gun and glue gun sticks
Frame of any size
Piece of card stock, cut to fit your frame

1. First, find some leaves! I used some glossy, fairly sturdy leaves from a bush in front of my apartment. You'll need quite a bit, I probably grabbed about 60 or so.
2. Next, paint your leaves. I used spray paint to make this process quicker. I recommend priming the leaves first, I found the color dried better when I did this (see photo below). Let dry completely.
Leaf without primer in the center, you can see how the paint doesn't look as bright and the leaf shows through a little more. 
3. Cut your card stock to fit into your frame.

4. Plug in your glue gun, and begin glueing your leaves onto the card stock. I found it was easiest to apply the glue to the leaf itself. Be gentle with the leaves so the paint doesn't crack. 

5. Keep glueing! I went from bottom to top, overlaying the leaves and switching directions each layer. 

6. Once all your layers are glued, you can go back and touch up any paint that may have cracked with a paintbrush.
7. Let dry completely and hang!


Monday, July 8, 2013

Bleach Pen Jeans


I have seen a few jeans with bleach designs and thought it would be fun to recreate them at home for a lot cheaper. I thought about just using plain ol' bleach, but then I found out about Clorox bleach pens! Genius. The bleach pen is a gel consistency, which makes it harder to mess up your design.

I picked up a pair of shorts from the thrift store, but you may already have a pair of jeans/shorts you are ready to update/don't mind if you mess them up.

You need:
Jeans
Clorox pen
Wax paper
Needle (optional, but helpful)

Lay jeans out and place pieces of wax paper under the area you plan on bleaching. This way the bleach doesn't bleed through the other side. Using the bleach pen, carefully draw your design. I recommend practicing with it on a piece of paper first so you get the feel for it. After, use the needle to straighten out your lines and pop any bubbles that might have formed.

 Tip: Make sure your design has an even layer of bleach, otherwise certain areas will have a stronger color (in the picture above, the bleach isn't as even as it should be, I went over it again with more bleach).

 Now just let the bleach sit for about 1 hour. The bleach will look drier, and you will be able to tell the area you bleached is lighter. If you are using very dark jeans, you may want to leave the bleach on longer. Rinse your jeans in the sink to get off the bleach and then wash them in the machine. Let jeans dry and examine your work! If you want the design to be brighter, simply go over the design again with more bleach.

Thursday, June 6, 2013

Coconut Oil, Avocado & Honey Hair Mask


My hair has to put up with a lot of abuse. I use some kind of hot styling tool everyday, color it about once a month, and use the blow dryer often. All of this heat and chemicals can lead to some really dry and fragile hair!

I'm fortunate to have fairly strong hair, but it can get pretty dry. To fix this, I have been experimenting with homemade hair masks. This mask left my hair feeling really soft without weighing it down. My hair also smelled great and my normal frizz was reduced.

Honey is a humectant and emollient making it a good at attracting and retaining water. Coconut oil seals moisture into the hair, making it shinier and stronger. Coconut oil also contains vitamin E and K which nourish the hair and scalp. Avocados contain vitamin E and B, which is essential for hair growth. Avocados are also full of their own oils which are highly humectant and emollient. Bottom line, put these things on your hair!

This recipe was just the right amount for my medium length, medium thickness hair. If you have very long, or thick hair I would recommend doubling the amount of ingredients. Likewise, if you're hair is very short you could probably cut it in half.


Coconut Oil Avocado & Honey Hair Mask
1/2 ripe avocado
2 tablespoons coconut oil
1 tablespoon honey

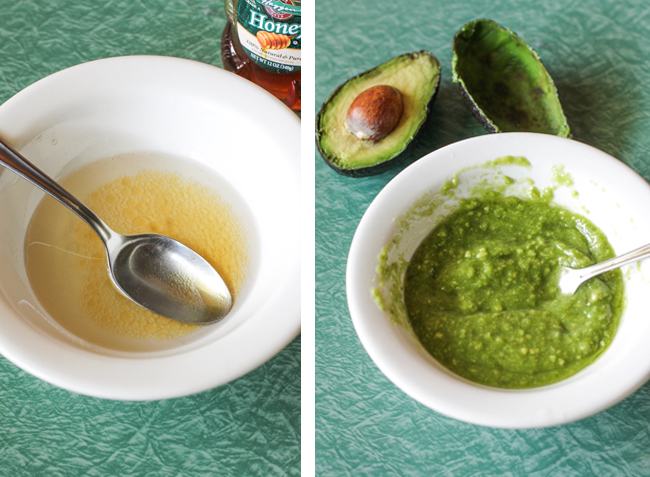
1. Place coconut oil in a microwavable bowl, and microwave for about 15-20 seconds until melted. Add honey and stir until mixture is somewhat combined. If honey is still thick, place mixture back into the microwave for about another 10 seconds. Mixture should be warm, be careful not to get the oil too hot.
2. Add avocado and use a fork to mash and incorporate with the honey and oil. Continue to mash and stir until well combined and smooth (it's okay if they are still some small lumps of avocado).
3. Comb through hair to detangle (hair should be dry). Starting with the ends, saturate hair with mixture. Once the ends of your hair are covered, part hair down the middle and place mask on the scalp, working it through the hair. Cover the hair around your hairline then work the mask all throughout your hair.
4. Once all your hair is covered, pull hair up into a pony tail or bun. Let mask sit for about 30-60 minutes.
5. Once you're ready to wash it out, place shampoo on hair and begin to lather before getting it wet. Water and oil don't mix well and getting it wet first will make it harder to remove. Lather shampoo through hair, then add water and rinse. Shampoo again to ensure all the oil has been removed. Follow with conditioner.

Sunday, May 19, 2013

Dala Horse "Makeover"


A few weeks ago I stumbled upon this kooky dala horse at the Goodwill. Not only did it have  a strange "nerdy" paint job, but it was wearing glasses! Jackpot. Being a swede, dala horses are not only cute, they are a symbol of my heritage. My grandma has a few in her house, so I was really excited to find such a unique dala horse for my place!

I debated if I wanted to paint the dala horse in the traditional style because it was really intimidating! I'm not the best painter and the designs on dala horses are pretty intricate. I decided to use the traditional style as a reference but put my own spin on it. It took me two days to finish it and I really love the result! I'm so excited to have a unique dala horse of my own.


Saturday, March 30, 2013

ombre easter eggs

My favorite Easter memory happened when I was about five or six. My mom and I went to a local high school for an Easter egg "hunt."  There was no hunting whatsoever, all the eggs were   placed on the football field in plain sight; it was more of a easter egg dash. All the kids stood around the edge of the field and when the whistle blew, we all ran to grab as many plastic eggs as possible.

As I was filling my basket, a younger girl asked if she could have a few of my eggs so I gave some to her. One of the volunteers at the event saw me giving the girl some eggs and gave me a special gold egg in return. I was able to trade the gold egg in for a huge easter basket, complete for candy and dollar store toys. Score! Lesson learned.


While easter egg hunts are kinda off limits to twenty-somethings who don't have children or aren't visiting family, decorating eggs is still acceptable. I saw a few ombre eggs floating around Pinterest, so I decided to give it a try! I think I found a technique that works pretty well.

You need:
Hard boiled eggs (I used this method)
Food coloring
White vinegar
Boiling hot water
Martini glass
Deep bowl/dish/cup


1. After eggs have been cooked, choose what colors you'd like to use. Fill bowl/dish/cup with about 6-9 drops of food coloring, 1 tablespoon vinegar and 1 cup hot water. Your egg should be submerged in dye (If not fully submerged, remember to stir around container continuously. Leave in dye for about 1-2 minutes, or until egg has taken on a light amount of color. Take egg out of dye, rinse and let pat dry.

** I recommend completing the previous step (and all following) on all eggs before moving on to the next. You don't want to keep making new dyes!

2. In the martini glass, prepare a slightly stronger mixture. Mix about a tablespoon vinegar and approx. ten drops of food coloring in to martini glass. Place egg in mixture, and add hot water until dye reaches the desired level on the egg. Let sit in dye for 2-3 minutes, or until egg has reached desired color.


3. Rinse egg off in water and pat dry. Make another dye (approx. 1 tablespoon vinegar, ten drops of color and hot water to desired level) and let egg sit for another 2-3 minutes (longer if color is not deep enough). Rinse and pat dry. Voila! Beautiful ombre eggs.

Saturday, July 14, 2012

my clothing rack

    Tommy and I have been together for five years, and recently moved into a place for just the two of us. Previously, we had been living with my friend Kelsey. In our previous house we each had our own bedroom, which some people think is a little strange. But for us, having our own rooms works really well. We each have a lot of stuff, and like to have our own space.

    So when we started looking for a new place, we wanted a two bedroom house. When we found that, we had to decide who would get the slightly larger room. I had the bigger space in our previous house, so this time he took the larger room. Unfortunately for me, this also ment the small closet. Our house was probably built in the 1920's or so, so when I say small closet...I really mean it.

    This closet simply wasn't big enough, even with my dresser. So, Tommy started to build me a clothing rack to accommodate my wardrobe. It's finally done, and I wanted to share the process with you! I love how it turned out!


Here are the materials, minus the paint and primer.


I first primed both the pipes and wood before moving onto painting.


I chose to paint the wood a light blue, and paint the pipes white. I loved the name of the paint, it was called, "Refreshing Pool." My room is full of bold colors, so I wanted the rack to be colorful but light.

I unfortunately didn't get pictures of the assembly, because Tommy did most of it while I was at work. But you guys are smart cookies, so I'm sure you know it took some screws and a drill.


Tuesday, June 12, 2012

Heart Magnets

   
   Now that school is over, I am determined to get this house tidy and looking good. After working in the yard for a couple hours, I realized I need more magnets to hang all the stuff on my fridge! After rummaging through the boxes with my craft supplies, I thought these little wooden hearts would be perfect! I'm very happy with how they turned out.

You need:
  • small wooden hearts (I purchased these at JoAnne Fabric)
  • small round magnets (I got mine at Michael's)
  • old magazines/ cute paper
  • glue
  • paint brush to spread glue (optional)


1. Look through old magazines, and cut out patterns that you're drawn to. If you have pretty paper you can use that as well.


2. Place a heart on the back side of paper, and trace.


3. Cut out traced heart. I find that cutting slightly on the inside of the pen line works best.


4. Glue pattern to heart, then glue magnet to the back of the heart.


5. Place on fridge or other magnetic surface!


Thursday, April 19, 2012

DIY Nail Polish from Pigment

   Nail art has really taken off in the past year or so. While I fully support all the cute nail art, my nails have never been a huge priority to me. Of course I love getting my nails done, but this happens probably once or twice a year. I never really buy polish and do it myself either; I always scuff them up right after I paint them and it drives me nuts.

   Lately though, I have been inspired by all the great nail ideas out there. I have even started to accumulate a little polish collection! When I saw this post by Keiko Lynn, about how to make your own nail color out of pigment and clear polish, I had to give it a try!

You need:
Makeup pigment (I  used MAC's "Melon")
Clear polish or top coat
Something to mix it in
Something to mix with (I used a bobby pin)
Nail polish remover to clean your brush


1. Pour some pigment into your mixing container, and add your clear polish. I used a bobby pin to mix the two together. There wasn't much rhyme or reason to the amounts I used. Basically enough polish to get the right consistency, and enough pigment to get a good amount of color. I tested this by smearing some on a piece of paper.


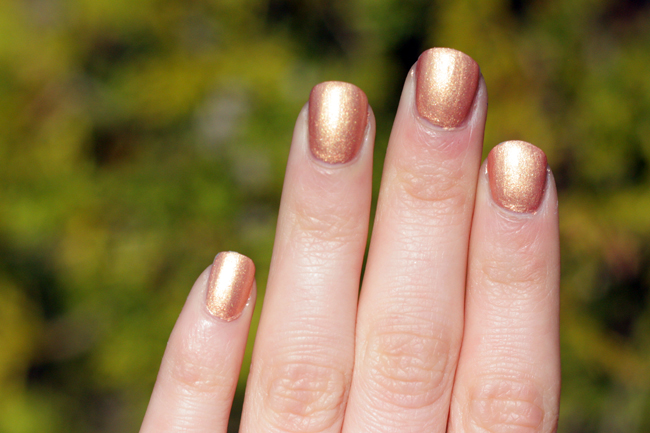
2. Paint nails! I did two coats, then cleaned off my brush. Definitely need nail polish remover for cleaning your brush! Once clean, do a top coat to seal color.


And voila! So easy. I'm sure it would be fun to mix pigments together to create a custom color, or add the pigment to a colored nail polish!


Sunday, April 8, 2012

A Somewhat Successful Attempt at Dying Easter Eggs Naturally


    Not every craft project turns out perfect, especially when it's your first attempt. After seeing all the neat ideas for egg decorations on pinterest, I felt inspired to decorate some eggs for the first time in a few years. But silly me, I forgot to buy egg dye! A quick search led me to this post by The Kitchn on how to dye eggs naturally.

    I had some red cabbage in my fridge, so I gave it a try. I followed the directions from The Kitchn, but in case you're lazy and don't want to click on it, here's what I did.

1. Bring 4 cups of water to a boil.
2. Chop about 1/4 of a head of red cabbage and add to water.
3. Let cook in boiling water for a few minutes, then cover and let simmer for about 20 minutes.
4. Strain cabbage, and collect dyed water in the bowl you want to dye your eggs in.
5. Let water sit for about 20 minutes to cool, and then add 4 tablespoons of vinegar (I used red wine vinegar).
6. Add eggs, and let sit in dye for a few hours or until they have reached your desired color.

    The color I ended up with was a nice light blue. I used both white and brown eggs to see the end result for both, and the white eggs turned out much better. The brown eggs resulted in a greenish/greyish/blue.

     Here is where things went awry. I taped some triangles to my eggs using electrical tape in order to make them a little more festive. This idea came from my aunt Britta's blog, who made some really cute easter eggs using tape. The trouble was that since my eggs soaked in the dye for so long (about 3-4 hours) the tape started to peel off, resulting in less than perfect (safe to say crappy) shapes. Bummer.

Do you see that one good triangle!? The triangle was my pride and joy.

   
   Oh they just look kinda sad, don't they? All in all, I think I will try dying eggs naturally again, but I will probably leave the decorating for after the soak. Have any of you guys tried dying eggs with natural dyes? Did it work for you? 


Wednesday, December 14, 2011

DIY: Doily Snowflake Ornamnets


Here is a super cute and easy DIY to decorate your Christmas tree! I made a few of these little guys last night, and it only took me about 30 minutes.

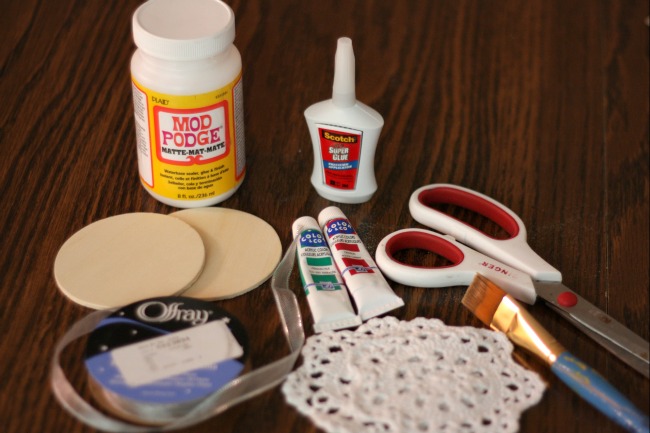
Here's what you will need:

  I got all these materials at JoAnne's.
  • Small Doilies 
  • Wood circles 
  • Glue (Super glue, or Modge Podge)
  • Ribbon
  • Paint
  • Scissors
  • Optional: Glitter Paint 

1. Paint your wood circles any color you wish. I chose green and red to keep things festive!


2. I chose to add some sparkle to my doilies. I mixed gold and silver glitter paint to paint them.


3. Put some super glue (or modge podge) in the center of your circle, and around the edges.
4. Slap that cute little doily on your circle! Let dry.


5. Take your ribbon and thread it through a hole on the doily. Cut and tie to create your hanger. 


6. Hang and enjoy! Aren't they cute? I love the little bit of color that peaks out. Now that I think about it, these would be nice coasters too!