Image Map
Showing posts with label beauty. Show all posts

Sunday, October 20, 2013

The Perfect Red

Red hair is tricky because it's really easy to mess up. Especially when you dye it yourself like I do, sometimes it turns out too purplish, too dark, light or Ronald McDonaldish. Recently I have been tempted to have it colored professionally because I am dying to get this beautiful orange, golden red! If you dye your hair yourself, any tips on how to get this color?


Sources, top left clockwise: Pinterest (source unknown), Fashion Rogue, Ow Yeah Ginger Heads (tumblr),  The Glamroui, The Ruffle House, New York Times Style Magazine, Redhead Rousses 

Thursday, October 3, 2013

What to Splurge on at the Cosmetic Counter

Working in cosmetics for a few years has exposed me to lots of different cosmetic products. There are so many to choose from, and unfortunately they can get really, really expensive. We all have to budget and prioritize, and now that I've had the opportunity to try quite a few pricier items, I know what I will continue to spend the big bucks on for years to come. Here is what I recommend splurging on when you visit the cosmetic counters!


Foundation/Powder
This is my number one item to splurge on for a few reasons. It's so important to find a formula that is correct for your skin type, and having a person help you in that process is so helpful. There are so many options to consider when it comes to foundation (coverage, spf, oil-free, finish, application, etc), so finding the right one at a drugstore can be tricky.

Also, it's almost impossible to choose the right shade at the drugstore! It might look good in the bottle, but the color always looks different on skin. You can end up spending a lot of money simply trying to find the right color, or you can pay a little more and get it right the first try. Time is money!

Moisturizer
Keeping your skin hydrated is crucial to healthy skin. It protects skin from environmental aggressors and helps slow down the aging process. I'm not scared of aging or anything, but if I can fight off a few wrinkles, I'm gonna do it! Pricier moisturizers have lots of technology behind them, and there are plenty of options depending on your skin concern. While dropping $50 on a jar of cream might seem like a lot (because it is), those jars last forever and will make a big difference in the future. Gotta be proactive.

Eyeliner
Is there anything worse than smudgy eyeliner that doesn't stay in place? Okay yes, there are definitely worse things. But smudgy eyeliner is a bummer. Find one that you love, and then spend the extra few dollars on it. You'll thank yourself when you don't have to wipe black eyeliner off your face. Clinique makes a good one, but if you really feel like splurging, I've also loved eyeliners from Yves Saint Laurent and Smashbox.

Serum
If you have never used a serum before, I highly recommend giving one a try. A serum is a lightweight concoction of active ingredients that you apply before a moisturizer. Basically serums give you faster results than moisturizers because the ingredients are more concentrated, but they usually don't moisturize. Use the right one, and serums can change your skin! I've seen what a huge difference they have made in my skins texture, radiance and overall evenness and I'm hooked.

What do you splurge on when it comes to cosmetics/skincare? I'm definitely more likely to drop big bucks when it comes to skincare rather than color products. What about you, what products do you think are worth the extra money? I'd love to hear your input!

Thursday, August 22, 2013

My Favorite Clinique Products


I have been working as a Clinique consultant for the past three years. It started as a part time job while in school, and since graduating I have moved up to full time. While I don't see it as something I'll do forever (customer service can wear on you) it has been a great company to work for! Clinique treats their employees really well, and it's awesome selling products you truly believe in.

All that being said, I thought it would be fun to share with you my top five Clinique products. I have tried almost all their stuff, and while there has never been anything I've hated, I definitely have my favorites! Have you tried Clinique before or use it currently? I would love to hear what you love (or dislike).

In no particular order...

1. Turnaround Concentrate Radiance Renewer // This serum is awesome if you want softer, brighter, more radiant skin. I feel it's definitely an underrated serum from Clinique because not many people identify radiance as a real concern for their skin. This stuff basically speeds up your cell renewal process, so your skin makes healthy skin cells faster! This results in more radiant and even-toned skin. I find this helps a lot with breakout as well!

2. Chubby Stick Intense Moisturizing Lip Color Balm // This lip product is a variation of the extremely popular chubby sticks, which are a sheer lip balms. These have a similar texture as the original, but the intense version has more pigment. So instead of a lip balm, these act more as a stain which I love. They are also made with mango and shea butter, so your lips stay soft. My favorite shade is "Heftiest Hibiscus," which is a super bright orange.

3. Quickliner For Eyes Intense // Love, love this liner. I use the "Intense Ebony," just about everyday! It's super creamy, smooth, loaded with pigment and once it dries it stays all day long. I love the rich pigment it has; the "Intense Ebony," gives the look of a liquid liner but is easier to apply. Clinique recently added some new colors too!

4. Even Better Eyes Dark Circle Corrector // I have really dark circles all the time, no matter how much sleep I get. While this eye cream hasn't completely corrected this problem (no product ever will), it helps a ton! Lightweight yet hydrating, this eye cream has a slight tint that works for all skin tones. This tint doesn't cover the darkness, but rather creates a panty-hose effect so the darkness blends in better with the rest of your face. It also helps with puffiness as well!

5. Stay-Matte Oil-Free Makeup // If you have oilier skin like me, this foundation is awesome. By midday, my foundation is always sliding off my face due to oil production. This actually stays in place all day and has an awesome matte finish and moderate coverage. I always finish with a little powder to help further curb oil.


Wednesday, June 19, 2013

5 Tips for Cosmetic Shopping in a Department Store

Buying makeup can be a lot of fun, but it can also be a little overwhelming. This is especially true when shopping in a department store full of options! After working in this environment for two years, I have learned a few really simple tips for making this experience much easier and enjoyable. Because at the end of the day, shopping for makeup should be fun!


1. Find your beauty-expert spirit-animal Huh? Yes, your beauty-expert spirit-animal. What I mean by this is try to find a beauty consultant (at your favorite brand, preferably) who you feel comfortable with and want to go back to again and again. This can make your experience so much more fun and easy! When you have a go-to person they will start to learn what you like and don't like, call you when products you might be interested in arrive, and (most likely) hook you up with samples :). It's just like building a relationship with a hairdresser or even your doctor (yeah, bit of a stretch there, but you know what I mean).

PS: I was quick to mention favorite brand because each brand hires and trains their own consultants. These consultants know most about their brand and will want to sell it to you. This is not because they are malicious sales people, but because they have the most knowledge and personal experience about this brand in particular. Do not expect every beauty consultant to be an expert on every brand, that's a lot of products!

2. Think about what you are looking for before you head to the store Shopping for makeup can be really overwhelming because there are so many options! I recommend going in with a rough idea of what you're looking for. I say "rough idea" because it's important to be open to other things. Are you looking for eyeshadow, lipstick, skincare, or all the above? If looking for an eyeshadow for example, consider what color, texture, or effect you'd like it to have. Are you looking for something everyday, or more special occasion?

If you have no idea that's okay, but these are questions you will probably be asked. When a customer comes in with absolutely no clue of what they are looking for, it can be really hard to give them the best experience! Sometimes when people are not comfortable with makeup lingo, it's easier to articulate what they want with a picture.

3. Do some research online This ties in with the last tip because sometimes it can be easier to narrow down your search by doing a little research online first. I don't really recommend buying makeup online because the colors represented are usually way off, but researching products online can be helpful to learn about different brands, read reviews, and watch tutorials. There is so much knowledge regarding beauty products online, definitely take advantage! That way, when you go to the store, you won't feel overwhelmed because you have already learned about some products and the consultants can then help you decide.

4. Don't be afraid to try things on This is probably the most important tip. One of the major perks about buying beauty products from a department store if that you can try them on first! This is especially important when buying foundation or lipstick because it's so hard to tell what the color in the bottle will look like on you. So do yourself a favor, try it on first! Can't stress it enough. It takes about five minutes to get a foundation match and even less to try on a few lipsticks. Believe me, it's worth it, and that's what makeup consultants are there for!

Oh, and if you want to try something on, ask. Not because the salespeople don't trust you with the product, but because it needs to be cleaned first! I cringe a little (or a lot) when I see people pick up a tester and put it straight on their eyes or lips. You never know who might have used it before you.

5. Yes, you can have a sample (but not ten) Trying a sample of a product first is another perk of shopping in a department store versus a drug store. If you try something on in store and are not sure about it, it's okay to ask for a sample. Just keep in mind that not every product can be sampled out, such as lipstick or eyeshadow. Also, keep in mind that most skincare samples will give you an idea of how your skin reacts to it, but you won't see the longterm results from the product (particularly true for serums). Oh, and it might seem like common sense, but people sometimes forget that samples are given with the hope that you will love the product and then buy it (not return again and again for more samples.)

Hope these help you! Do you have any tips or strategies for when you go makeup shopping? I would love to hear them!

Thursday, June 6, 2013

Coconut Oil, Avocado & Honey Hair Mask


My hair has to put up with a lot of abuse. I use some kind of hot styling tool everyday, color it about once a month, and use the blow dryer often. All of this heat and chemicals can lead to some really dry and fragile hair!

I'm fortunate to have fairly strong hair, but it can get pretty dry. To fix this, I have been experimenting with homemade hair masks. This mask left my hair feeling really soft without weighing it down. My hair also smelled great and my normal frizz was reduced.

Honey is a humectant and emollient making it a good at attracting and retaining water. Coconut oil seals moisture into the hair, making it shinier and stronger. Coconut oil also contains vitamin E and K which nourish the hair and scalp. Avocados contain vitamin E and B, which is essential for hair growth. Avocados are also full of their own oils which are highly humectant and emollient. Bottom line, put these things on your hair!

This recipe was just the right amount for my medium length, medium thickness hair. If you have very long, or thick hair I would recommend doubling the amount of ingredients. Likewise, if you're hair is very short you could probably cut it in half.


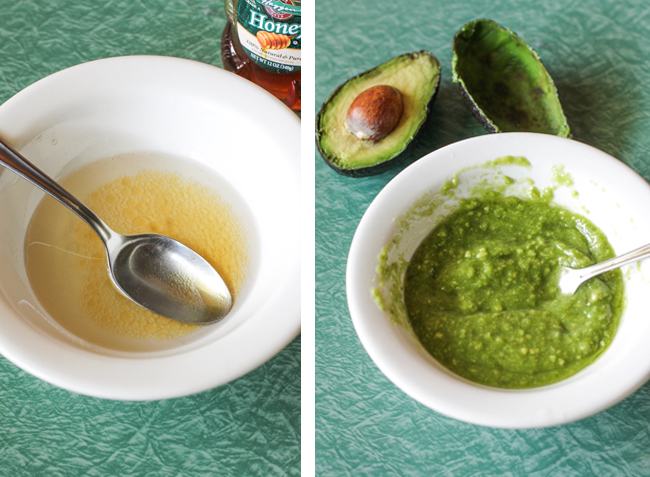
Coconut Oil Avocado & Honey Hair Mask
1/2 ripe avocado
2 tablespoons coconut oil
1 tablespoon honey

1. Place coconut oil in a microwavable bowl, and microwave for about 15-20 seconds until melted. Add honey and stir until mixture is somewhat combined. If honey is still thick, place mixture back into the microwave for about another 10 seconds. Mixture should be warm, be careful not to get the oil too hot.
2. Add avocado and use a fork to mash and incorporate with the honey and oil. Continue to mash and stir until well combined and smooth (it's okay if they are still some small lumps of avocado).
3. Comb through hair to detangle (hair should be dry). Starting with the ends, saturate hair with mixture. Once the ends of your hair are covered, part hair down the middle and place mask on the scalp, working it through the hair. Cover the hair around your hairline then work the mask all throughout your hair.
4. Once all your hair is covered, pull hair up into a pony tail or bun. Let mask sit for about 30-60 minutes.
5. Once you're ready to wash it out, place shampoo on hair and begin to lather before getting it wet. Water and oil don't mix well and getting it wet first will make it harder to remove. Lather shampoo through hair, then add water and rinse. Shampoo again to ensure all the oil has been removed. Follow with conditioner.

Tuesday, May 14, 2013

Witch Hazel and Rose Water Toner

The amount of skincare products out there is mind boggling. So many brands, ingredients, price points and sales pitches...how do you choose? Working for Clinique certainly helps me narrow down my options, and while I love and stand by their products, sometimes it's nice to use something more natural. It also doesn't hurt when this natural product is cheap and can be purchased at the drugstore! Say hello to witch hazel, a natural astringent.

Witch hazel is actually derived from the leaves and bark of the North American Witch-hazel shrub (according to wiki). Neat, huh? Before I started working for Clinique, witch hazel was a regular part of my daily skin care routine. I used it every night after washing my face. It left my face feeling fresh, clean, and breakout free. I have recently started using it again in a mixture of rosewater, which works as an anti-inflammatory. Rose water also just smells nice...the smell of witch hazel is not for everybody. Or anybody.


Witch Hazel and Rose Water Toner
Witch Hazel
Rose Water
Container (I got mine from Michael's)

The "recipe" for this toner will be different depending on what kind of skin you have. If your skin is dry or dry combination, use half witch hazel and half rose water. If your skin is comfortable or oily (like mine), use 3/4 witch hazel and 1/4 rose water. Place product on a cotton ball, and sweep across face twice daily after removing makeup and before moisturizer.

1. Mix witch hazel and rose water in container depending on your skin type.
2. Store in bathroom cabinet or in fridge if desired. Putting it in the fridge just makes it cold and refreshing!

Monday, March 11, 2013

my hair color routine

A wrote a post about hair dye a long time ago, but since then I have changed my dying routine a bit, so I thought a new post was in order! 

Like I said in my older post, I used to be blonde up until my freshman year of college when I went brunette. It was a nice change, but brown just wasn't for me. I soon tried red, and I don't see it going anywhere anytime soon! 

On average, I dye my hair about every 5 weeks. Sometimes I wait longer, and sometimes I need to dye it before then. It all depends on how often you wash your hair, the type of shampoo you use, the temperature of your water and what type of hair dye. 

Make your red hair last longer:
  • Wait as long as you can to wash your hair. I usually wash mine about every three days. Dry shampoo (or baby powder) is your friend! 
  • When you do shower, use a sulfate free shampoo. I have used really expensive and cheaper shampoos, and the one I keep coming back to is Loreal's EverPure Volume Shampoo and conditioner. 
  • Wash your hair with water that is as cold as you can stand. If you can handle washing your hair with icy water, this would make the red last much longer. Personally I don't have that willpower, but do try to turn the temperature down when I wash it. When I wash my hair for the first time after dying it, I usually use cold water. 
  • Try different dyes, see which work for you the best. I used Loreal Preference for a long time, and liked it just fine. That is until I got my hands on some Redken Color Gels thanks to a friend of mine with a cosmo license. The Redken Color Gels are more vibrant and last longer for me, but if you don't have access to a professional beauty supply store, hop over to Sally's and try Loreal. 
So you wanna go red? I'd be happy to show you my hair color method! You need a color applicator bottle, gloves, developer (I use level 30) and your color. I have recently been mixing one part "Flame," with two parts "Bonfire." "Bonfire" is an orange base and a  level 6 (smaller the level number, the lighter your color will be) while "Flame" is a red base level 7. 


I like to use more "Bonfire," because it's an orange base rather than a red base, and I like it really warm and orange-y. Pay attention to the bases of your colors! They could be blue, violet, gold, red, orange, etc. These undertones play a huge part in what your color will turn out like. For example if I grabbed a blue base and used it with my red, I would get more of a violet-red, rather than an orange. If you wanna read more about all this, I recommend reading this and this.


Make sure your hair is well brushed, to make application easier. Once hair is brushed thoroughly, make sure you got your gloves on! Oh, and a raggedy shirt is good to have as well.


I like to first put my hair up in order to get the color at my roots in the back. Squeeze out color directly onto roots, and massage in with fingers. Once you have your back hairline covered in color,  let down another section of hair, securing the remainder on the top of your head. Massage color into roots, then squeeze color onto gloves and apply to the entire strand, making sure to get the ends. 


Repeat this process until all hair is covered in dye. Take a wet washcloth that you don't care about and clean up any dye that may have gotten on your skin (don't forget your ears and back hairline!). Wait about 30 minutes and wash with cool water. Yay, fresh and vibrant red hair!

Monday, February 4, 2013

Pretty in Pink Lipstick Giveaway!


Yesterday Tommy and I celebrated our sixth year anniversary, and in a few weeks we get to celebrate love all over again with Valentine's Day. All this lovey-dovey stuff has inspired me to spread the mushy feelings with you all as well!

Valentine's Day is all about pink, so I'm giving away two of my favorite Clinique pink lipsticks! Up for grabs is a Chubby Stick Intense in "Roomiest Rose," and a Different Lipstick in "Glazed Berry." If you haven't used a chubby stick (yes, get the giggles out) then you are missing out! They are my favorite Clinique lip product by far.

Oh, why the Clinique products? Well I work for them! I'm not payed to plug their products, but there are lots that I truly love, and I want to share them with you.

Want to win? Easy peasy. Simply follow Amanda K. by the Bay as a mandatory entry, then complete additional entry options if you'd like. You know you wanna :)
***You must be a follower in order to win! 

a Rafflecopter giveaway

Wednesday, December 12, 2012

Stocking Stuffers: Cosmetic Junkie


Stockings are one of my favorite things about opening presents on Christmas morning. Stockings aren't a huge deal at my moms house, one year they were even forgotten about for a couple hours. Usually filled with M&M's and shaving cream, stockings are a silly way to end the morning.

But, my dad would go all out when it came to stockings. He would buy a bunch of little things  and wrap everything individually so it was like opening another five presents! Some things were from the dollar store, and others were things we had asked for.

Because of my love for stockings in all their different purposes, I wanted to present a few collections of stocking inspired gifts! First up, the gal who loves all things cosmetics! Some of these items I have used and loved, and a few are on my wish list.

1. M·A·C 'Perfectly Plush -Mineralize' Brush Kit
2. Clinique Chubby Stick Moisturizing Lip Colour Balm
3. Clear Improvement Active Charcoal Mask To Clear Pores
4. Lancôme Hypnôse Star Mascara
5. Urban Decay Naked2 Palette 
6. NaiLuv 'Merry Mermaid' Gel Nail Polish
7. sara happ 'The Lip Scrub - Red Velvet' Lip Exfoliator

Saturday, September 15, 2012

hair chop


I went for the big chop! Five inches according to my hairdresser, although friends think it was much more than that. So I'm guessing it around 6 to 7. It feels so light and bouncy and when I washed it, I used such a small amount of shampoo...yay!

I needed the change, and I'm really glad I went to Lisa at Honey Salon, she was so sweet and easy to talk to. Oh, and I love my haircut!

Friday, June 29, 2012

lipsticks tips & favorites

Let's talk about the wonderful world of lipstick, shall we?

First, I would like to acknowledge how awesome it is. There are few things that come in such a small package, and yet have the power to completely change a look. It's relatively cheap, there are a thousand options from color to finish, and application is pretty fool proof.

While some women hop from various colors and brands, others have a lipstick that is "theirs." It is a color they feel comfortable in and keep coming back for. Having a favorite color is cool, but it's fun to try new things! Especially when it's something that's so easy to remove.

A few tips when choosing a new lip color:
1.) Consider when you'll be wearing it. Are you looking for an everyday lip color, or a product for special occasions? If it's something you'll wear everyday, choose something you feel comfortable in. If it's going to be a "special color," pick something slightly out of your comfort zone!
2.) Decide what kind of texture and finish you like. Thick and matte, or creamy and glossy? Remember that this choice will probably affect how long it lasts on your lips. The glossier the lip product, the faster it will come off (generally).
3.) Taste and fragrance. Do you like your lip products to smell, or do you prefer fragrance free? If you don't mind fragrance, smell different brands and find one you like.
4.) Skin tone is the most important thing to consider when choosing a color. Eye and hair color can play a role, but figuring out if you have a warm or cool undertone to your skin will really help narrow down your options!
5.) Try it on if you can. If you're shopping in a department store with testers, don't just try it on your hands. The shade will look different on your lips! Kindly ask the person behind the counter to clean off the product for you.

Here are a few of my favorite lip colors! Personally, I like to stick with warm tones such as red, orange or coral. 

1. Sephora's Rouge Cream lipstick in "It Girl." This lipstick is a rich orangey-red that is super long wearing and highly pigmented. It has a nice matte finish and ultra thick texture. This is the only lipstick of mine that I like to apply with a brush, because of the texture and deep color. Putting on a bit of chapstick before hand is a good way to go, because it can be a little drying.

2. Clinique's Chubby Stick in "Mega Melon." This product is great for summer because it's less of a lipstick and more of a tinted chapstick. Made with mango and shea butter, it feels great on the lips. Also so easy to apply! No need for a mirror.

3. Clinique's Butter Shine lipstick in "Ambrosia."  This lipstick is a Clinique "Butter Shine," lipstick, which means it has a glossier texture and finish. I love, love, love this color. Orange red with little specks of gold, it's perfect if you have a warm undertone.

4. MAC's "Vegas Volt." I wasn't sure about this color at first, because it's lighter and more pink than I usually wear. But it soon grew on me! The texture is smooth and it wears great throughout the day.


Thursday, April 19, 2012

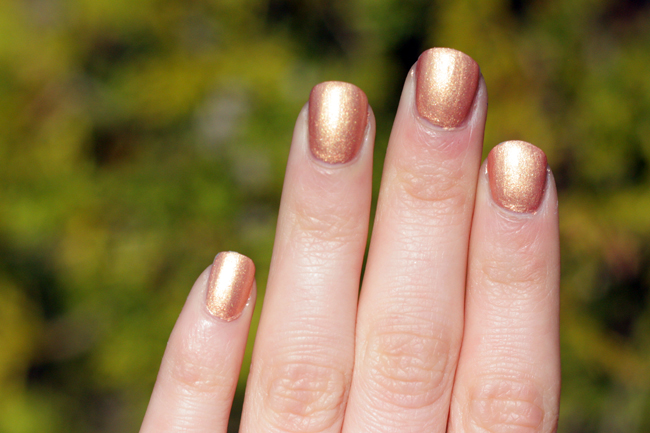
DIY Nail Polish from Pigment

   Nail art has really taken off in the past year or so. While I fully support all the cute nail art, my nails have never been a huge priority to me. Of course I love getting my nails done, but this happens probably once or twice a year. I never really buy polish and do it myself either; I always scuff them up right after I paint them and it drives me nuts.

   Lately though, I have been inspired by all the great nail ideas out there. I have even started to accumulate a little polish collection! When I saw this post by Keiko Lynn, about how to make your own nail color out of pigment and clear polish, I had to give it a try!

You need:
Makeup pigment (I  used MAC's "Melon")
Clear polish or top coat
Something to mix it in
Something to mix with (I used a bobby pin)
Nail polish remover to clean your brush


1. Pour some pigment into your mixing container, and add your clear polish. I used a bobby pin to mix the two together. There wasn't much rhyme or reason to the amounts I used. Basically enough polish to get the right consistency, and enough pigment to get a good amount of color. I tested this by smearing some on a piece of paper.


2. Paint nails! I did two coats, then cleaned off my brush. Definitely need nail polish remover for cleaning your brush! Once clean, do a top coat to seal color.


And voila! So easy. I'm sure it would be fun to mix pigments together to create a custom color, or add the pigment to a colored nail polish!


Monday, March 19, 2012

lazy monday


  The picture above pretty much summarizes my day. And although it's not over yet, I think it's safe to say today has been awesome. Spring break, please never leave me. I have spent nearly the entire day (save a quick trip to the supply store for hair dye) in my pajamas, reading Game of Thrones. I am so close to being done, and can't wait to start the next book!


    Adding to today's awesomeness was a Birchbox! I have been receiving them for about four months now, and they have gotten increasingly better. You can read about the first one I got here. I was pretty bummed with the service at that point, but decided to give it another month. I'm glad I did, because I have gotten to try some great products. If you are thinking about trying Birchbox, I would recommend doing so. Keep in mind that some months are better than others!

   Here are a few highlights from the box I received today:

Two Kusmi green tea bags. I gave this tea a try today and really loved it. Green tea is one of my favorites, and it was the perfect addition to my lounging party.

 A generous amount of Miss Jessie's Quick Curls. I have wavy hair, so I am always looking for a product to add definition, but not weigh my hair down. Can't wait to give this a try!

 A sample of three eye shadows from Stila. I have never tried Stila eyeshadows before, and these colors are right up my alley. 

 Tomorrow I need to be productive, but I only have a few more days to read this book! Gotta finish it tomorrow, so I can start on the next. I don't work for the next three days, which is pretty amazing. When school is in session I feel like I go nonstop, so these next few days are much needed.

  Also, Kate from Katelyn Brooke Designs featured my new layout made by Hannah! It was a really fun process creating the layout, so hearing such nice things about the end result feels pretty amazing. Kate is a designer herself, and has created some really lovely layouts! You can head over to the post here, and then hop over to Kate's other blog, Stripes and Polka Dots

  Oh, and for all you fellow Pacific Northwest bloggers, the Pacific Northwest Blogger Meetup was announced! I did not go last year (cause you know...I wasn't a blogger then), and I would really love to make it this year.Trouble is it's down in Portland, and I won't be done with the quarter so I don't really see it happening. Maybe though! Anybody planning on attending?

Friday, February 24, 2012

Lead in your lipstick


    Did you guys hear about the study that found lead in 400 lipsticks? 400! I just don't understand why lead is in our lipsticks.While they claim it is in very small amounts that are not hazardous, it still freaks me out. You can read the article here.

Saturday, February 18, 2012

7 Tips To Drink More Water


I'm a big water drinker. It's my drink of choice just about everywhere because:
a.) it's usually free. 
b.) it's refreshing.
c.) it doesn't mess with the flavor of my food.
d.) it's good for me.

Every now and then I slack on drinking water, and I always feel pretty awful when I do. I get tired, my skin breaks out, I get headaches and you know...I'm thirsty. I always ask people when they come to the counter how much water they drink, because not getting enough water can really impact your skin. Here are a few tips on how to stay hydrated!


1. Keep a water bottle with you wherever you go!
This is a big one. At work I have a Camelbak water bottle, and I always have a large Aquafina bottle that I refill and keep using in my school bag. I recommend buying a real bottle, as plastic bottles consume additional petrochemicals. I'm just being cheap at the moment.
I set a goal to drink a certain amount of these water bottles everyday. It's way easier to drink four water bottles than drinking "8 glasses of water." If you don't drink a lot of water, start slow and build up. As a rule of thumb, you should drink half of your body weight in ounces of water a day.
Ex: If you are 100 pounds, you should drink 50 oz of water a day. Of course this varies, but it's easy to remember.

2. Stop drinking soda.
I have never been a soda person. Sure, I enjoy the occasional root beer or cream soda every blue moon. But it is just so sweet and hurts my throat. I mean, c'mon, it's carbonated sugar water. Whenever I drink it, I always think, "I'm basically drinking syrup right now." Replacing soda (or as I call it, "pop") with water will not only replace remove a lot of calories from your diet, but your body will be so much happier!

3. Flavor it if you need to.
Water can get boring. It's just so...watery. Sometimes you need a little flavor! Sometimes I buy a low-calorie iced-tea mix at the store, but the best way to flavor your water is with produce in your fridge. My favorite is  adding cucumber and lemon, as pictured above. It just gives your water that little bit of flavor you want, but is not overpowering.  I always drink more water at restaurants when they add lemon! Experiment and find some flavors you like. Frozen fruit is a great option; frozen blueberries, raspberries or peaches add some sweetness!

4. Add some ice and a straw!
This sounds kinda silly, but I think it helps. When water is super cold, I drink it like nobody's business.  Same thing when I add a straw. Maybe it's just more fun drinking from a straw? Maybe you feel fancier? I really don't know. But hearing the clinking of ice in my glass and being able to twirl the straw around helps me to drink more water. 

5. Purify your water.
I'm very lucky to live in an area with delicious tap water. But I have been to other areas of the country with water that tastes pretty nasty (Florida, I'm looking at you.) Getting a Britta system is not too expensive, and makes a huge difference in the taste of water. You will drink so much more water when it tastes good. Also, spending money on a purification system could possibly guilt you into drinking more water. Similar to spending money on a gym. Paying for it makes you use it!

6. Drink water every few bites throughout your meal.
Take a drink of water every one to two bites you take during a meal. It sounds a little excessive, I know. But, it will help to slow your eating by forcing you to put down the fork. It will also fill up your tummy with water instead of food, and help you to eat less. And look at that! You just downed a few glasses of water during your meal. Voila!

7. Drink tea, not coffee.
Okay. Totally guilty. Like...really, really guilty. I choose coffee over tea about  97% of the time. Getting to drink coffee is one of the highlights of my day. I love it. Not to perpetuate stereotypes or anything, but I live in Seattle. Loving coffee is almost a requirement.
But when summer comes around and I don't have to go to class, I drink a lot more tea. And I hate to admit it...but my body is grateful. Caffeine in coffee is a mild diuretic and can increase urine excretion. This can be neutralized by drinking an extra glass of water, but why not just drink caffeine-free tea instead? (Answer: because coffee is the nectar of the gods.)

So go drink some water! You will thank yourself. Once you get in the habit, it's so easy and delicious!


Monday, December 12, 2011

makeup bag peak


Here is a little peak inside my makeup bag. These are the products I use just about everyday. Yes...many are from Clinique, but no surprise there! 

1. Clinique's Chubby Stick. I use the color "Mega Melon," seriously everyday. They are a tinted chap-stick, so no stickiness of a gloss, and lighter than a lipstick.
2. Clinique's Perfectly Real Powder Foundation. I have always been a liquid foundation girl, but have recently made the switch to a powder. This one gives full coverage, and controls shine.
3. Diorshow mascara. My lovely coworker at the Dior counter gave me a sample of this mascara, and I love it. It gives such thick, full lashes!
4. MAC pigments. These little guys have so many uses, and last for years. The color shown above is "Naked," but I use "Melon."
5. Clinique Touch Base. This eyeshadow primer helps eyeshadow look brighter, and last longer. I use "Canvas," or "Canvas Light," if I want my eyeshadow to appear brighter.
6. Smashbox Brow Tech To Go. So easy to use, and the color looks natural and stays all day. It also has a comb with lightweight gel to keep brows in place.
7. Smashbox Jet Set Waterproof Eye Liner. Seriously awesome. Gives the allusion of a liquid liner, without the fuss. Stays put and lasts forever!
8. Clarins Everlasting Fondation. Has the consistency of a lightweight foundation, with the coverage of a concealer. This is the only thing I have found to cover up my dark circles, and not crease.

Do you have products that you use everyday? I would love to here them! I'm always on the look out for my new favorite product.

Monday, November 28, 2011

A little about hair dye

   I used to be very, very blonde. It was a large part of who I was; "the girl with the super blonde hair." I'm not exactly sure what prompted my desire to go dark during my freshman year at Western. I think I wanted to move away from blonde stereotypes, and be taken a little more seriously. Also, starting college gives you a chance to rebuild your identity, and I didn't want to be "the blonde girl" anymore.


    So, just like that I went dark. It was a huuuuuge change, and for the most part I liked it. But after being so blonde, having dark hair felt...kind of dull. I needed some oomph. This is when I started to experiment with red, which I loved so much more. Sometimes I still miss my blonde hair, but the red feels more like me. Interesting how simply changing your hair color can make you feel like a whole new person!

   I get asked a lot about my hair color. Most people where I get it done at, to which I reply, "in my bathroom!" I simply don't have the money to get it done at a salon. Also, my mom used to be a hairdresser so she taught me how to do it myself. Back when I was blonde we would foil each other's hair, which would take forever. That's another thing I like about dark hair; simply squirting a bottle of hair dye on your head is so much easier than messing with bleach!

   Because I get asked about how I color my hair so often, I thought I would do a post about it. Now, I am no expert when it comes to coloring your hair. I have done it a lot, and sometimes it turns out better than others. But here is a very simplified explanation on how to mix your own color. Say goodbye to your box of color! Mixing it yourself is so easy, fun and more cost effective.


   First, the tools. You need a bottle (I like one that holds at least 8 oz.), plastic gloves, and an after color treatment/conditioner. I really like to use the Ion Color Sealer (shown above) right after my color.

  To mix color, you need the actual color and a developer. Developer comes in different levels; Level 10, 20, 30 and 40. Developer is what initiates the coloring process. Higher levels of developer means it has more strength. The stronger it is, the lighter it will make your hair.  Hair color comes in different levels as well that range from 1 (black) to 10 (blonde). Simply put, the larger the level, the lighter the hair color. If you are dying your hair dark, stick with 10, 20 and maybe 30 if you want more lift. 40 should really only be used if you are bleaching your hair. This is a very simple explanation; for a better one, go here.


   I like to mix 2 ounces of a red color with one ounce of a brown. I have found a bit of brown helps to neutralize the red a bit. Pay attention to the base colors. The red I used above had a pure red base, while the brown had blue and red. I usually choose different colors every time, so every time I dye it, it comes out a little differently. But I have found that adding a bit of blue will give it more of a purple-y hue, while adding orange, or red while keep it warmer. No big surprise here. This site has a better explanation of color bases.


   Then  add your developer! My dye called for even parts, so I put in 3 ounces. I used two ounces of 30, and one ounce of 20. Usually I only use 20, but I have been experimenting with 30. After this time, I will probably stick with 20 because it's less damaging.
   I have yet to run into a color that didn't need equal parts developer, but check the back of your hair dye bottle to be sure. Shake it up, and start applying to your head! Make sure you have combed through your hair to get the tangles out.


   I first apply the color to my roots, and let it sit for about 5-10 minutes. Because my roots are lighter than the ends, I like the color to sit a little longer there. This helps to create a more even color. Then in sections starting in the back, apply the rest of your color. I like to then make a bun on my head and let it process for about another 20 minutes. When you're done applying, be sure to wash your hands, and wipe off the dye on your face and neck.

  Wash your hair, and let the conditioner/treatment sit extra long. Your hair will thank you. Now go to Sally's and buy yourself some color and developer! Say no to the box. You will get more predictable results when you mix it yourself. Like I said, every time I dye my hair, it turns out a little bit differently. But that is part of the fun!

Wednesday, November 16, 2011

First Birchbox


  Finally got my first Birchbox in the mail today! I was pretty excited to see what little beauty samples awaited me.

 My box contained: Zoya fingernail polish in "Noel," a sample of Kate Spade's fragrance "Twirl," Supersmile toothpaste, Jouer lip enhancer and a Alex and Isabelle hair tie.


  Overall, I'm not super impressed, but not really let down either. Before trying it out I had read some bad reviews about Birchbox, saying that the samples were mediocre or bad. So I wasn't expecting to be blown away.

  The thing I'm most excited about is the nail polish, I never paint my nails and hate spending money on polish (it's so expensive!). Kate Spade's fragrance is nice, very fresh and sweet. The lip balm has a rosy scent to it, and feels good on the lips. But it's such a small amount, I'm sure it will be lost by tomorrow. The hair tie is nice...but let's be honest...it's a piece of elastic. And the toothpaste? Haven't tried it yet...but I have plenty of toothpaste. And I mean, it's toothpaste. I wanted beauty products, not oral hygiene products!


   I'm going to give it another month. Like I said, I'm not let down. I'm sure a lot of the $10 a month goes towards the packaging (which was super cute) and shipping. I just better not get any freakin' toothpaste next month, or pieces of elastic.

   What do you guys think? Total rip off? I was a little bit less excited about my box once I went to Birchbox.com and saw all the possible things I could have gotten. Beggars can't be choosers I suppose.

Sunday, November 13, 2011

Beach Plum Shadow Tutorial

   As I've gotten older, my skin care routine has gotten more complex, and my makeup routine more simple. I used to wear all kinds of crazy shadows and mascara colors when I was in junior high. At one point I rocked some MAC pink mascara. Not a good look. But towards high school, I became more low key.

  That being said, I work in cosmetics. So, I do need to wear different eye shadow looks every now and then. Usually I just wear a nude shadow with a liquid liner cat eye.

  When I wear eye shadow, other than a nude or grey, I am usually wearing Beach Plum by Clinique. It's the only purple I can wear without it making my dark circles even darker. It is probably the color I apply the most at work, because it comes with a great gold (I wear the almost gold everyday), as well as a pop of color with the purple. I would recommend Beach Plum for people with a gold, or neutral undertone.

  Before I start with the pictures, I want to give huge props to the beauty bloggers out there. It's difficult to do your makeup while trying to take pictures!


 First, prep your face. For me this includes eye cream, foundation primer, foundation, finishing powder and filling in my eyebrows.  Products used from left to right: All About Eyes from Clinique, City Block SPF 25 from Clinique, Everlasting Foundation from Clarins, Blended Face Powder from Clinique, and Brow Tech To Go from Smashbox.


 Prep your lids with some primer. This makes a big difference! It gives your shadow something to stick to, and helps prevent it from creasing. I used Clinique's Touch Base in "Canvas Light." Note to self: tame those eyebrows. 


 Sweep the gold shadow all over your lid, just above your eyeball, but not up to your brow.To do this, I used the Eye Shader Brush from Clinique.


Next, using a contour brush (I'm using MAC's 219 Pencil Brush) place the the purple shadow in your crease. Blending the shadow into your crease, stop when you get to the middle of your eye. Then place shadow from the outside corner towards your lash line. I like to tell my clients to make an inverted triangle, with a point on the outside corner.


Bring a little of the purple to the bottom corner of your eye. I like to apply shadow to only about 1/3 of my eye. Darkness around my eye area is a problem, and too much dark shadow makes my dark circles more noticeable. If this isn't a problem for you, and you want a more dramatic look, bring the shadow halfway, or even all the way if you're feeling crazy.


Should look somethin' like this when open. 


I sometimes like to give my eye a little more definition by taking a darker purple, and applying it to the very outer corner of my eye. I used Clinique's "Midnight Plum" pictured above. For some reason, I don't have a picture of me doing this...sorry! Just focus on the outer corner, blending it into the lighter purple.


Next, we are gonna add a little bit of liner. I used Clinique's Cream Shaper in "Egyptian," pictured above. This is my favorite color eye liner, it's a very unique blend of black, gold and green!


Using one hand to pull my lid outwards, I line my eyes from about halfway all the way to the outside corner. I don't have a very large lid, but if you do you could line your eye all the way to the inside corner. I like to take the liner a little past my outside corner, which makes them look larger.


If you wish, line the bottom of your lid as well. As you can see, I went a little further than halfway.


Now some mascara to the top and bottom. As you can see, I used Clinique's High Definition Mascara in "Black."


Ta da! To finish, I used a bit of Blushing Blush Powder in "Aglow" from Clinique, as well as a a bit of Clinique's Long Lasting Glosswear in "Clearly Pink."